I have gone back to eating my old standby lunch these days. I ate it at least twice a week when I worked. It's not very exciting but it's easy and healthy. I get to eat a good portion of vegetables from the lettuce and protein from tuna. It also uses a Newman's Own dressing so I thought I would feature this salad as a homage to Paul Newman.
Thai Salad with Tuna
This salad only requires assembling. I would bring lettuce to work. I had a bottle of dressing in the shared refridgerator and a few cans of tuna in my desk drawer. Clover Leaf makes a range of flavours for tuna but the Spicy Thai Chili is by far my favourite. Between the tuna and the dressing, the salad has a great kick that ensure it is not a boring salad.
* lettuce, washed and torn
* Newman's Own low fat sesame Thai dressing
* ½ can spicy tuna
Toss lettuce with dressing.
Add tuna and mix.
Tada!
Tuesday, September 30, 2008
Monday, September 29, 2008
Before & After: My Kitchen Chairs (Finally...)
While I knew that my blog would be mainly focused on food, I wanted to also have some house-focused posts. I bought my house over two years ago. It's 80 years old and had already been renovated. Now I only have to worry about making it pretty... It's been two years and I've done a few things but there are still a lot of projects out there.
If you're wondering whether I only ate while I was visiting my mom in Montréal, the answer is no. I also got to work on upholstering two of my kitchen chairs. Well, when I say "I", I mean we, as in my mother and I. Not only is my mom a good cook, she does other stuff very well too, like sewing. She's actually sewing my drapes (I can't wait for them to be done!). Supposedly, she knows a bit about reupholstering chairs too.
I suffer from great plans and indecision. I asked my mother's friend if I could have the four chairs she was going to throw out, oh, about 5 years ago. I was planning on refinishing and reupholstering them. I tried to refinish the frame 3 years ago, but it was hard work. So I gave up and forgot them in the rain. A couple of chairs kind of got mouldy. I also have never been able to find a fabric that I was happy with. So the chairs sat there because of my indecision.
Finally, I found a nice brown and white material I liked in Vietnam. I hauled back two metres. After shopping at a Montréal fabric store with my mom for backing for my drapes, I found another material I liked better for my chairs. My mom thought it was sturdier too for seating. So I decided to buy it and I (my mom) will make cushions out of the fabric from Vietnam (my sister also has her eyes on it!).
I really enjoy the Before & After entries on Design*Sponge, so here is mine. Mine is a much simpler makeover but it's a good start.
Before & After. You can imagine the old chair was not very comfortable either.
Reupholstering Chairs
I meant to take pictures while upholstering but the job requires lots of focus and hands, so I did not take any pictures in the process. This is something that is more easily done by two people - one holding the fabric taut, the other stapling. It's all about keeping the fabric TAUT (I like that word: TAUT! TAUT!). Casa Sugar has better reupholstering instructions and even directs to a Ready Made video, if you need.
Chairs with removable seating
Foam to cover your chairs
Staple gun with short staples (1/4")
Fabric to cover seating
Remove the seating from chairs - usually requires unscrewing a few screws.
Cut out a piece of foam in the shape of your seat.
Staple the foam in place on one edge and the opposite edge - just to keep the foam in place when you staple your fabric.
If you have a patterned fabric, make sure you know which way you'd like to have it and cut out each piece in the same direction.
Cut out a piece of fabric in the shape of your seat with an extra 2" around the perimeter.
Fold the fabric in at the edge before stapling - to prevent from fraying.
Staple the fabric on one edge in the middle on the back side.
While pulilng the material taut, staple on the opposite edge in the middle also.
Do the same with the other two edges.
From each of the centre, staple toward each of the corners.
The corners are the hardest. Gather the material, pull, keep the fabric taut and staple.
Tada!
The old seat and a piece of foam over it.
Make sure you don't cover the screw holes - we did that once...!
Newly upholstered seat.
If you're wondering whether I only ate while I was visiting my mom in Montréal, the answer is no. I also got to work on upholstering two of my kitchen chairs. Well, when I say "I", I mean we, as in my mother and I. Not only is my mom a good cook, she does other stuff very well too, like sewing. She's actually sewing my drapes (I can't wait for them to be done!). Supposedly, she knows a bit about reupholstering chairs too.
I suffer from great plans and indecision. I asked my mother's friend if I could have the four chairs she was going to throw out, oh, about 5 years ago. I was planning on refinishing and reupholstering them. I tried to refinish the frame 3 years ago, but it was hard work. So I gave up and forgot them in the rain. A couple of chairs kind of got mouldy. I also have never been able to find a fabric that I was happy with. So the chairs sat there because of my indecision.
Finally, I found a nice brown and white material I liked in Vietnam. I hauled back two metres. After shopping at a Montréal fabric store with my mom for backing for my drapes, I found another material I liked better for my chairs. My mom thought it was sturdier too for seating. So I decided to buy it and I (my mom) will make cushions out of the fabric from Vietnam (my sister also has her eyes on it!).
I really enjoy the Before & After entries on Design*Sponge, so here is mine. Mine is a much simpler makeover but it's a good start.
Before & After. You can imagine the old chair was not very comfortable either.
Reupholstering Chairs
I meant to take pictures while upholstering but the job requires lots of focus and hands, so I did not take any pictures in the process. This is something that is more easily done by two people - one holding the fabric taut, the other stapling. It's all about keeping the fabric TAUT (I like that word: TAUT! TAUT!). Casa Sugar has better reupholstering instructions and even directs to a Ready Made video, if you need.
Chairs with removable seating
Foam to cover your chairs
Staple gun with short staples (1/4")
Fabric to cover seating
Remove the seating from chairs - usually requires unscrewing a few screws.
Cut out a piece of foam in the shape of your seat.
Staple the foam in place on one edge and the opposite edge - just to keep the foam in place when you staple your fabric.
If you have a patterned fabric, make sure you know which way you'd like to have it and cut out each piece in the same direction.
Cut out a piece of fabric in the shape of your seat with an extra 2" around the perimeter.
Fold the fabric in at the edge before stapling - to prevent from fraying.
Staple the fabric on one edge in the middle on the back side.
While pulilng the material taut, staple on the opposite edge in the middle also.
Do the same with the other two edges.
From each of the centre, staple toward each of the corners.
The corners are the hardest. Gather the material, pull, keep the fabric taut and staple.
Tada!
The old seat and a piece of foam over it.
Make sure you don't cover the screw holes - we did that once...!
Newly upholstered seat.
Sunday, September 28, 2008
With Rice: Cà Tím Dồn Thịt (Stuffed Eggplant)
This is the last post of my mom's cooking for a bit. I am writing back at home, where I have to cook for myself... However, my mom may come for a visit in a few weeks and I'll try to get her to cook up some more things then.
Cà tím dồn thịt (stuffed eggplant with meat) is one of my favourite dishes to eat with rice. I like the pieces of eggplant stuffed with meat. I like the soy sauce that I can drizzle on my rice. When I visit my mom, I usually get a Tupperware (well, not real - that stuff is expensive!) full to take home with me and this visit was no different!
Like bánh củ cải, this is a dim sum dish that I never order at dim sum. I have eaten a very similar dish in my alleyway in Vietnam; they were various vegetables, such as khổ qua (bitter melon), tomatoes, eggplant and tofu, stuffed with a meat filling in a sweet sauce.
Cà Tím Dồn Thịt (Stuffed Eggplant)
My mom first fries the eggplant stuffed with meat, makes the sauce and then combines everything. This is not really a healthy recipe; eggplants absorb a lot of oil. Check Wandering Chopsticks' healthier version that is steamed! She also uses shrimp only! The pork and shrimp mixture is my mom's standard mixture for many Vietnamese dishes that require stuffing.
* 100 g ground pork
* 100 g shrimp, chopped
* ½ small onion, chopped
* salt and pepper, to taste
* 2 Japanese eggplants, sliced on the diagonal, 1.5" thick and then sliced more than halfway again to make a "sandwich" - see picture below
* 2 cups water
* 1 Tbsp dark soy sauce
* 3 Tbsp sugar
* oil
* 1-½ tsp salt
Combine the first four ingredients into a food processor until you get an even mixture.
Stuff the eggplant pieces with a teaspoon or so of the filling. (I did a lot of this growing up. If a piece of the eggplant breaks off, just stick it to the meat. That's what I did...)
Fry eggplant "sandwiches" on each side and set aside - it does not have to be cooked through because it will continue cooking in the sauce.
Remove the fried pieces and set aside.
Once all the pieces are fried, add the water, dark soy sauce, sugar and salt to make the sauce.
Bring to a boil and add the eggplant "sandwiches" back in the sauce.
Lower heat to simmering and leave for half an hour.
Serve with rice.
Tada! (And hope for leftovers!)
Meat and shrimp mixture.
Stuff each eggplant "sandwich" with meat filling.
Eggplant "sandwich".
Eggplant "sandwiches" ready to be fried.
Eggplant "sandwiches" back in the sauce.
It does not look great but it's SO good. To be fair, this was microwaved when I got back to my home.
Cà tím dồn thịt (stuffed eggplant with meat) is one of my favourite dishes to eat with rice. I like the pieces of eggplant stuffed with meat. I like the soy sauce that I can drizzle on my rice. When I visit my mom, I usually get a Tupperware (well, not real - that stuff is expensive!) full to take home with me and this visit was no different!
Like bánh củ cải, this is a dim sum dish that I never order at dim sum. I have eaten a very similar dish in my alleyway in Vietnam; they were various vegetables, such as khổ qua (bitter melon), tomatoes, eggplant and tofu, stuffed with a meat filling in a sweet sauce.
Cà Tím Dồn Thịt (Stuffed Eggplant)
My mom first fries the eggplant stuffed with meat, makes the sauce and then combines everything. This is not really a healthy recipe; eggplants absorb a lot of oil. Check Wandering Chopsticks' healthier version that is steamed! She also uses shrimp only! The pork and shrimp mixture is my mom's standard mixture for many Vietnamese dishes that require stuffing.
* 100 g ground pork
* 100 g shrimp, chopped
* ½ small onion, chopped
* salt and pepper, to taste
* 2 Japanese eggplants, sliced on the diagonal, 1.5" thick and then sliced more than halfway again to make a "sandwich" - see picture below
* 2 cups water
* 1 Tbsp dark soy sauce
* 3 Tbsp sugar
* oil
* 1-½ tsp salt
Combine the first four ingredients into a food processor until you get an even mixture.
Stuff the eggplant pieces with a teaspoon or so of the filling. (I did a lot of this growing up. If a piece of the eggplant breaks off, just stick it to the meat. That's what I did...)
Fry eggplant "sandwiches" on each side and set aside - it does not have to be cooked through because it will continue cooking in the sauce.
Remove the fried pieces and set aside.
Once all the pieces are fried, add the water, dark soy sauce, sugar and salt to make the sauce.
Bring to a boil and add the eggplant "sandwiches" back in the sauce.
Lower heat to simmering and leave for half an hour.
Serve with rice.
Tada! (And hope for leftovers!)
Meat and shrimp mixture.
Stuff each eggplant "sandwich" with meat filling.
Eggplant "sandwich".
Eggplant "sandwiches" ready to be fried.
Eggplant "sandwiches" back in the sauce.
It does not look great but it's SO good. To be fair, this was microwaved when I got back to my home.
Saturday, September 27, 2008
Mom's Recipes: Ram Bắp (Corn Spring Rolls)
Ram bắp (corn spring rolls) is a specialty of Quảng Ngãi, where my mom grew up. Typically, chả giò (Vietnamese spring rolls) are made of pork and crab. These special spring rolls are mainly made of corn instead. My mom usually makes them in the summer when corn is in season but she has been known to freeze some (before frying) and fry them during the off season.
This is a favourite of many friends of mine, including my friends C & R who invited my sister L, her boyfriend D and myself for dinner. So I thought I would bring this for an appetizer and take the opportunity to write about it.
Ram Bắp (Corn Spring Rolls) - makes about 36
A few notes about the ingredients. These are the same ingredients my mom uses for chả giò, replacing the corn with pork, and with the addition of shredded carrots. I remember one of my aunts in California adding mung bean to the mixture and my aunt in Quảng Ngãi adding taro root. Wandering Chopsticks also made it with grated carrots. So you can really add whatever you want. Vietnamese spring rolls are typically rolled in rice paper but we use Chinese wrappers. I actually like the saltiness and chewiness of rice paper, but it requires more work (dipping it in water first).
* 3 ears of corn, thinly sliced (fresh corn must be used to be sliced!)
* 1 little bunch (37.5 g) bean thread noodles, soaked and drained
* 1 handful of nấm mèo (wood ear mushroom), soaked and drained
* 1-½ tsp salt
* ¼ tsp pepper
* 1-½ package (or more) spring roll wrappers of your choice
* a bit of cornstarch mixed into water
* oil for deep frying
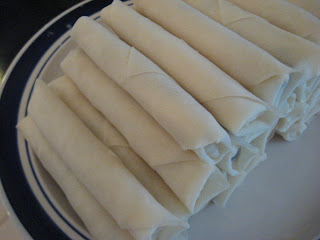
Package of spring roll wrappers.
Soak and drain bean thread noodles and wood ear mushroom.
Roughly cut the noodle and mushrooms with scissors.
Thinly slice corn by holding the corn in one hand, and knife in the other. I should have take a picture... but Wandering Chopsticks has a good one!
Mix everything together with salt and pepper.
If the mixture is wet, drain it through a sieve (or it will tear the wrapper).
Roll the filling in a wrapper - pictorial below.
Heat up oil. You can test it by adding a spring roll - the oil is hot enough if there are little bubbles.
Deep fry each spring rolls.
Tada!
While holding the filling secure, fold each side in. This picture isn't accurate because I was taking a picture... I hold the filling with the left hand, pull the right side in with the right hand, hold it with the right hand and pull the left side in with the left hand. Got that?
Complete rolling. If some spring rolls do tear, put them aside and fry at the end, in case the filling spills out.
This is a favourite of many friends of mine, including my friends C & R who invited my sister L, her boyfriend D and myself for dinner. So I thought I would bring this for an appetizer and take the opportunity to write about it.
Ram Bắp (Corn Spring Rolls) - makes about 36
A few notes about the ingredients. These are the same ingredients my mom uses for chả giò, replacing the corn with pork, and with the addition of shredded carrots. I remember one of my aunts in California adding mung bean to the mixture and my aunt in Quảng Ngãi adding taro root. Wandering Chopsticks also made it with grated carrots. So you can really add whatever you want. Vietnamese spring rolls are typically rolled in rice paper but we use Chinese wrappers. I actually like the saltiness and chewiness of rice paper, but it requires more work (dipping it in water first).
* 3 ears of corn, thinly sliced (fresh corn must be used to be sliced!)
* 1 little bunch (37.5 g) bean thread noodles, soaked and drained
* 1 handful of nấm mèo (wood ear mushroom), soaked and drained
* 1-½ tsp salt
* ¼ tsp pepper
* 1-½ package (or more) spring roll wrappers of your choice
* a bit of cornstarch mixed into water
* oil for deep frying
Package of spring roll wrappers.
Soak and drain bean thread noodles and wood ear mushroom.
Roughly cut the noodle and mushrooms with scissors.
Thinly slice corn by holding the corn in one hand, and knife in the other. I should have take a picture... but Wandering Chopsticks has a good one!
Mix everything together with salt and pepper.
If the mixture is wet, drain it through a sieve (or it will tear the wrapper).
Roll the filling in a wrapper - pictorial below.
Heat up oil. You can test it by adding a spring roll - the oil is hot enough if there are little bubbles.
Deep fry each spring rolls.
Tada!
Everyone has their own way of rolling spring rolls; Wandering Chopsticks also has posted how-to-roll pictures - she rolls in while I roll out. My mom suggested I cut the wrapper in half diagonally and work with a triangle but I was worried it would be too thin. My mom also wanted to get the smaller wrappers to make cocktail size spring rolls but I was too lazy. I actually did a good job rolling here but I am not always consistent. Also, this represents years of rolling so don't worry if it doesn't come out well - practice makes perfect!
Place wrapper diagonally and fold one corner in.
Lay out about 1 tablespoon of the filling along the edge. Not too much or the spring roll will brake.
Fold the long side of the wrapper over the filling.
While holding the filling secure, fold each side in. This picture isn't accurate because I was taking a picture... I hold the filling with the left hand, pull the right side in with the right hand, hold it with the right hand and pull the left side in with the left hand. Got that?
The two sides folded in.
Once you have both sides tucked in, continue rolling with both hands. I just do it in one movement. Make sure it's tight enough or the spring roll will be limp. Dab the water and cornstarch mixture to the remaining edges so the spring rolls seals properly.
Complete rolling. If some spring rolls do tear, put them aside and fry at the end, in case the filling spills out.
Spring rolls ready to be deep fried.
My mom drains the spring rolls after deep frying.
We dip it in nước chấm or Thai chili sauce. I like to alternate with both, which means you can't just have one spring roll!
Friday, September 26, 2008
Deli Snowdon
5265 Décarie Boulevard
Montréal, Québec
514.488.9129
website
Montréal is reknown for a few dishes: bagels, poutine and smoked meat. On my last full day in Montréal, my mom, my sister and I went out for lunch and had smoked meat at Snowdon Deli. Most Montrealers would agree that the best smoked meat is from Schwartz's Deli. However, we were near Deli Snowdon and their smoked meat is pretty good too!
My mom does not like many Western dishes. It does not help that she does not like dairy food, so she won't eat anything with cheese or butter. Luckily, this does not exclude smoked meat and fries. She actually really enjoys it. I remember when my sister and I were young, she would bring home smoked meat sandwiches from a deli nearby.
Snowdon Deli.
My sister ordered chicken soup with Matzo ball ($3.50) - I'm a bad food blogger, I forgot to take a picture. I was even about to bite into my sandwich when my mom asked whether I was taking a picture... My sister L said the Matzo ball was good but the chicken broth tasted like it came from a package. We ordered two servings of smoked meat, lean and regular, cooked in the traditional style, one order of fries and one order of dill pickles. I did not order the lean meat because I have had it when it is too dry; my mom and sister said it was good though. Smoked meat is always piled ridiculously high; I cannot open my mouth that wide. The meat is well seasoned with its particular spices and very moist. SO good!!
Smoked meat sandiwch, $5.30. On the left is the lean meat and right is regular, on rye bread.
The fries were excellent, crispy on the inside, soft on the inside!
Thursday, September 25, 2008
With Rice: Trứng Hấp (Steamed Eggs)
I ate rice nearly every day growing up at home. At least weekdays for sure. On weekends, my mom would make more time consuming dishes, like phở. Typically with our rice, we had a protein dish, a vegetable dish and often a canh (Vietnamese soup). Since I have moved out, I have not eaten much rice regularly and so have not been eating any of these dishes either. I decided I would change that and learn the recipes.
Most of the dishes accompanying rice are not too time consuming. My mom would leave me instructions to prep vegetables and cook rice when I got home from school. So when she got back, she would just have to cook the ingredients.
Trứng Hấp (Steamed Eggs)
Trứng hấp is a steamed egg dish with ground pork, salted duck egg and century egg. Century eggs are not for everyone, but I like them! It's actually a recipe that my dad's family had, so it's Chinese. I like this dish but have not had it for a number of years since my mom only cooks "special" dishes when I visit and not "regular" ones like this.
* 100 g ground pork
* green onions or onion, chopped small
* 2 eggs, beaten
* 2 salted duck eggs (yolks only), sliced
* 2 century eggs, sliced
* 1 tsp salt
* garlic powder and pepper, to taste
* ¼ cup milk
Place all ingredients in a dish that will fit everything.
Mix the beaten eggs in with everything else.
Steam for 20 minutes; let a bit of air in - my mom leaves a chopsticks between the lid and steamer.
Tada!
All the raw ingredients in one dish.
Beaten eggs and pork mixed together
Steamed eggs. It does not look all that appetizing but it's good, I swear!
Wednesday, September 24, 2008
Ground Cherries
I was produce shopping with my mom for bánh xèo when I saw a basket of ground cherries (or physalis) with a sign "Mangez moi". I have a rule that I do not turn down free food so I was happy to oblige. I popped one in my mouth and my mom came by. She took one, peeled it and put it in her mouth. Oops, I didn't peel mine... My mom replies "could you please be less stupid so that others can be stupid too?" in Vietnamese. This is after I told her that The Gastronomer's mother used to tell her that growing up. You might not be able to teach an old dog new tricks, but you sure can teach your mom new insults...!
Ok, back to the ground cherries. They do not taste like cherries (nor does trái sơ ri). I found they were very fragrant. They were very sweet and reminded me of something I couldn't really pinpoint. They have seeds that remind me of figs. My sister said she thought of dragon fruit or prickly pears.
Tuesday, September 23, 2008
Mom's Recipes: Bánh Xèo (Vietnamese Savoury Crepes)
Bánh xèo is described in Wikipedia (they have an entry!) as
"Vietnamese crepe-type pancakes made out of rice flour, water and turmeric powder or coconut milk (in the Southern regions) stuffed with slivers of fatty pork, shrimp, and bean sprouts and is pan fried. They are served wrapped in lettuce leaves and stuffed with mint leaves or other herbs, and dipped in a prepared nước mắm (Vietnamese fish sauce) or soy sauce. In the Central region, the pancake is dipped in a special 'tuong' sauce which consists of liver, hoisin sauce and garlic. Southern style Bánh xèo are larger compared to the small pan-fried versions in the Central regions."
For the batter
Mix the rice flour, tempura mix and water.
Add the soy sauce.
Filling
Meat, shrimp and mushrooms ready to go. My mom even got a mushroom mix on sale for $1.49.
To assemble a bánh xèo
Heat oil into a pan - my mom's was an 8" pan. This is not a healthy dish -you need to be generous with the oil to make sure the bánh xèo is crispy.
You can also just eat bánh xèo on its own dipped in nước chấm or just roll it in lettuce leaves.
"Vietnamese crepe-type pancakes made out of rice flour, water and turmeric powder or coconut milk (in the Southern regions) stuffed with slivers of fatty pork, shrimp, and bean sprouts and is pan fried. They are served wrapped in lettuce leaves and stuffed with mint leaves or other herbs, and dipped in a prepared nước mắm (Vietnamese fish sauce) or soy sauce. In the Central region, the pancake is dipped in a special 'tuong' sauce which consists of liver, hoisin sauce and garlic. Southern style Bánh xèo are larger compared to the small pan-fried versions in the Central regions."
As the description above implies, there are many versions of bánh xèo. My mother, being from Central Vietnam, makes them crispier. Central Vietnamese bánh xèo tend to be smaller, but I think the size of my mother's bánh xèo is dictated by her frying pan. Huế has a dish called banh khoai, which seem to be a mini version of bánh xèo. When I was young, I used to ask to have my mom's friend, who came from Southern Vietnam, make soft bánh xèo. They are both good in their own way!
Bánh xèo is one of my favourite dishes since I like savoury, crispy food! I am spoiled so my mother will make these when I go home for a visit (as I am now in Montréal). For some hard-to-explain reason, my mother associates rainy weather with bánh xèo, as in "it's raining, hmmm, I could really go for bánh xèo". I guess it's sort of like PMS and chocolate. Anyway, when this happens, I will get a guilty call from my mother in Montréal. "I made bánh xèo, I wish you could be here. Your sister's enjoying them."
I had bánh xèo in Vietnam and none were as satisfactory as my mom's. I don't know if hers are better or just what I'm used to. First of all, my mom is quite generous with her filling while restaurant ones seemed to be quite spare. She has the traditional ingredients (bean sprouts, onions, shrimp, fatty pork) but she also adds beef and mushrooms (that's another bánh xèo evoking ingredient - "I saw these beautiful white mushrooms and I thought we could have bánh xèo"). Second of all, bánh xèo was always served with lettuce and herbs only. You're supposed to roll the bánh xèo in the lettuce. However, I grew up rolling all of the lettuce and herbs in rice paper and I think it's a much more satisfactory combination!
Bánh xèo is a time-consuming effort. You can only make one at a time and it's best eaten fresh off the pan. You have to be real special to be invited for bánh xèo at my mom's! When my mother makes bánh xèo, she'll make one for each of us (customized to specific tastes, no fatty pork in mine, no pork and shrimp in my sister's... I know. SO spoiled!). While we are stuffing our faces, she'll munch on one while cooking, often while having a beer (this time, it was rosé wine).
Wow, that was a long intro with no recipe in sight. Here it is... finally!
Bánh Xèo (makes 12 bánh xèo)
For the batter
My mother's batter oddly does not contain any of the two common ingredients: turmeric or coconut milk. She just adds some soy sauce for colour.
* 1 cup rice flour
* 1 cup tempura mix
* 2-½ cup water
* ½ tsp dark soy sauce
Mix the rice flour, tempura mix and water.
Add the soy sauce.
Set aside.
Filling
Ingredients for the filling should be sliced and ready to go because once you start making the bánh xèo, you will have to use them quickly.
* mushrooms, sliced
* onions, sliced
* protein of your choice, sliced or peeled (beef, shrimp, pork, or even tofu)
* bean sprouts
* 2 eggs, beaten
* 2 eggs, beaten
Meat, shrimp and mushrooms ready to go. My mom even got a mushroom mix on sale for $1.49.
To assemble a bánh xèo
Heat oil into a pan - my mom's was an 8" pan. This is not a healthy dish -you need to be generous with the oil to make sure the bánh xèo is crispy.
Stir fry the onions with the protein(s) of your choice and mushrooms.
Add a ladle and a half of the batter on top.
Add a generous handful of bean sprouts (I like a lot!)
Cover with a lid to make sure the top of the batter is cooked also.
Add a ladle and a half of the batter on top.
Add a generous handful of bean sprouts (I like a lot!)
Cover with a lid to make sure the top of the batter is cooked also.
Spoon some beaten eggs all over the bánh xèo.
Add more oil (yes, more!) on the edges to make it crispy (my mom says this is what differentiates Central Vietnamese bánh xèo from the Southern one).
When the batter looks cripsy, fold your bánh xèo in two by using chopsticks and lifting one half with a spatula.
Ladling the batter onto the pan.
My mom added spoonful of eggs all around.
The flip: chopsticks are holding one end while the spatula flips the other side.
Serve with
The bánh xèo is so rich that it is all about balancing the grea-Z-iness with fresh ingredients like lettuce and cucumber. We also like to have it with something tart. When we're lucky, my mom will find trái khế (star fruit or carambola) or green mango. This time, we had to improvise with green apples.
* rice paper
* lettuce
* cucumber sticks
* a tart fruit
* herbs, such as mint
* nước chấm
* nước chấm
To roll in rice paper (this is how I like it)
Dip rice paper in warm water and place on a flat plate.
Take a portion of bánh xèo - I take about a third - and place it on top of the wet rice paper at one end.
Add ingredients as you like - the lettuce, cucumber and herbs add freshness, a tart ingredient adds contrasts to the bánh xèo's greasiness.
Fold the rice paper over the ingredients, then the edges.
Continue rolling.
Dip in nước chấm.
Repeat until your heart (or stomatch) is content!
Tada!
You can also just eat bánh xèo on its own dipped in nước chấm or just roll it in lettuce leaves.
P.S. My mother will usually have a few extra ones, that I will enjoy cold in the morning. Kind of like pizza...
Bánh xèo, ready to be eaten.
Placing fresh ingredients on the bánh xèo.
Ready to eat, just dip in nước chấm.