Showing posts with label house. Show all posts

Wednesday, February 11, 2009

My Obsession with Cookbooks

This post combines both food and décor (sort of…). I think people are born collectors or not. I was born in the former category. I have felt the pull to collect things from a young age, such as Montréal subway stubs and stamp collecting. I also used to have a small coin collection and hockey cards (for the cute players!). Now I have my Canadian House & Home magazines and a collection of recipes on my laptop.

I also have quite the collection of cookbooks. Side note: my first cookbook was Ina Garten's Barefoot Contessa. I was given a gift certificate at a bookstore as a graduation present. I figured I could use a cookbook and I liked that each recipe had pictures. I find this rule holds true for most cookbooks since pictures attract my attention first. I selected the book not knowing who Ina Garten was and have been able to use many recipes since. My favourite recipe is the fresh corn salad and I always make the gazpacho soup in the summer.

Not only do I buy cookbooks that I think I will use, but I also buy cookbooks because I find the pictures are pretty, such as Williams Sonoma. I'm not sure that I use them sufficiently to justify their purchase, especially since I later found out that all the recipes are online!


Williams-Sonoma cookbooks and a couple of Weight Watchers ones.

I also like to buy inexpensive and quirky cookbooks. Quirky cookbooks are usually not very useful. Since I have not used them, I thought I would at least share them here, so I can tell myself I did not buy them for naught. Not only does the Alcatraz Women's Club Cook Book share recipes, but it briefly describes like "on the Rock" for the women and children. I picked up Any Idiot Can Cook with Simple Southern Recipes on a business trip to Kentucky (don't ask!). The recipes, including Coca Cola Salad, are accompanied by silly drawings.


Alcatraz Women's Club Cook Book.


Any Idiot Can Cook with Simple Southern Recipes.

I will also buy a cookbook if a friend writes one like The Vegetarian Manifesto by Jay Fothergill.

I stole this from my mom. Supposedly, I met Jean Chen when I was a baby and he thought I was adorable.

I had a subscription to Saveur for a year and I collect the free LCBO Food & Drink magazines.

My two most recent additions were Christmas gifts. I'm a lucky girl! My roommate G got me David Rocco's Dolce Vita. David Rocco has a Canadian TV food show. I also received Secrets of the Red Lantern: Stories and Vietnamese Recipes from the Heart, all the way from California from my friend The Gastronomer. I have flipped through both the books and will have to start cooking soon.


My Christmas gifts.

And you might wonder "How many recipes do I cook from these books?". The answer: "Not nearly enough!". But there is always tomorrow! What are your favourite or quirky cookbooks?

Thursday, December 18, 2008

DIY: Burlap Earring Frame

After introducing my sister to Design*Sponge, she now e-mails me projects that she likes. This corkboard idea interested both myself and her. She's still planning on making a corkboard while it inspired me to create an earring hanger.


There happened to be a bag of basmati rice that I figured would be perfect for this quick project. Ideally, you would use a nice frame and just cover the interior of the frame to show the frame off. However, I found an old mirror in the basement that I was going to donate so I decided to use it instead since it was the perfect price: FREE! Since the frame is not very nice, I just covered the whole mirror. The gap between the mirror and the fabric is perfect to fit the earrings!

Find a fabric that you like - I used a rice bag while maya*made use a coffee bag.
Cut the fabric so there are a few extra inches to staple it on each side of your frame.
Staple onto the back of the frame. If you do use a burlap bag with a print, don't pull too taut or the print becomes crooked (mine's slightly crooked, but don't tell anyone).
Hang earrings - now I have a reason to go buy MORE earrings!!
Tada!


Start with a frame, or a mirror in my case.


Use any fabric that is slightly larger than your frame.


Staple onto the back of the frame.

I now have a spot to hang my pretty earrings.

Sunday, November 2, 2008

Before & After: My Japanese Maple Tree

During the fall after I first bought my house, I bought a Japanese maple tree. It was on sale and cost about $50. Japanese maple trees come in a range of prices and can get quite pricey. I think mine was on sale because it was the off-season. The tree required a big hole; if the hole wasn't big enough, the tree would die within three years. It's been two, so I'll keep my fingers crossed.


I love this tree best in the fall because of the red, vivid colour of the leaves. In the summer, the leaves are green and rather blah; it's hard to differentiate the tree from the rest of the greenery. I don't think I realized how big this type of tree can get. There's a full size tree on my street that is beautiful but very big. Mine still has some way to go. It has grown a lot since last year!


In 2007, before and after a snowfall.


This year, my tree has grown quite a bit. It's very red right now. Lovely!

Monday, October 27, 2008

Before & After: My Couch

Since I mentioned my love of teak and I showed cushions on my couch, I wanted to share the before and after of my couch. I did not do this recently, but I just wanted to show the very drastic change it went through. No, my mother, nor I, did the upholstery. I bought the couch from a classified ad on a whim. I used my bonus money a few years ago to pay for the upholstery. It is totally true, upholstering will cost you as much as a new living room set, so only do it if you love it!


And I do love it. I really like the teak; my whole house would be furnished with teak if I could affort it - and it would look like a house stuck in the '60's! I also think that it is an usual piece. The wood contouring the back is quite unique. I will agree that it is not as comfortable as my sister's Skar Peppler but I like it just the same. I'm sure no one has pieces like this!

Before: picture from the classified. You have to love the yellow and brown stripes.


After: upholstered with a neutral colour, brushed cotton fabric.

Before.

After. This chair makes me laugh with its bowl shape.

Monday, October 20, 2008

Before & After: My Kitchen Chairs II

I have already written about two of the chairs reupholstered with the help of my mom (or by my mom with a little bit of my help). While she was here for a visit, I got her to help me with three more. Two were run-of-the mill, no big deal. I purchased them new at Winners seven years ago, when I finished school. There were only two available; this seemed to be the start of my mis-matched chair collection. I wasn't sure if I should cover them to match the rest since they look quite modern. However, the seating looked a bit dirty and I can always remove the fabric if I want.


The other one, with the original green vinyl upholstering, comes with a story. First of all, I love any retro-looking teak furniture. I spotted this chair while walking around one Saturday morning last year. I decided to buy it (for $10!!) and it had to be carried home.

I think this chair is very nice. I like the lines. I found out from the tag that it was made in Canada, about 40 years ago. It required some creative re-upholstering because of the top part. My mom totally came to the rescue. I could not have done it without her! You can see some staples in the back, but they are very subtle. To be fair, we could also see nails in the back on the green vinyl cover.


Now, I have a (nearly) perfect set of 5 chairs. When is the dinner party?

Saturday, October 18, 2008

Before & After: My Curtains

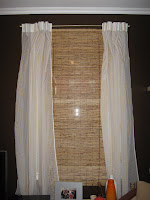
I fell in love with Kara Weaves of Kerala when it was featured on design*sponge. More specifically, I thought that maybe one day I could splurge and get curtains there, once I got a job. If I could have picked anything, I would have picked the diagonal or mango pattern in gold. However, I was shopping at Fabricland when I saw a fabric that was very similar to the vertical stripes in gold. The best part: it was $2 a metre!!


Then hanging out in Montreal, I found curtain rods at Zellers that were 40% off. Sweet! The only exception to my "financial luck" was that I wanted grommets. They were $8.99 for 8. I need 3 sets of 8, for the two sets of curtains. I thought it would be ridiculous to have grommets be the most expensive items for my curtains so my mom sewed me curtains with tabs instead. I can add grommets later when I find them on sale.

Window in my Dining Room.

Slowly, but surely, my home is starting to look "finished". Well, the downwstairs anyway; the upstairs is still a disaster!

Window in my Living Room.

Sunday, October 12, 2008

Cushions with Vietnamese Fabric

When I was in Vietnam, I regularly thought about my house, and more specifically how I wanted to further decorate it. Especially after reading design blogs. I lived on a street with 4-5 fabric stores and was always on the lookout for something out of the ordinary. A print caught my eye on my way to the gym one day. It was beige and white, and there was also a turquoise version (that I also purchased). When I inquired there were 2 metres left of a brown version. I promptly purchased it to recover my chairs.


I've already had a post about my chairs, reupholstered in a leaf pattern. I obvious did not get to use the Vietnamese fabric. I thought it would be perfect as cushions for my couch. So I took advantage of my mom, quite literally, and got her to sew me new cushions. I did take the chance to re-learn how to work the sewing machine she has left me (and that has not been used much...). I really hope to use my newly re-gained skills.


I really like the print and I think the cushions came out very well, especially with the buttons. This just proves that you can find nice fabric in Vietnam, you just have to look really hard!

Sunday, October 5, 2008

Drying Lavender

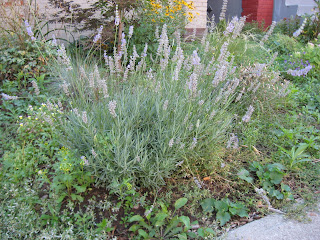
I did not have high expectations for my garden when I came back from Vietnam. My roommate G is not really a gardener and he travels a lot (who goes to Africa twice in one summer?). G did weed a couple of times while I was gone and I reapply appreciate it (Thanks G!). To my great surprise, I was happy to see the lavender that The Boyfrend planted last year was doing well and had greatly increased in size. It's lovely; every time I walk by, I get a great lavender scent!

I have a bouquet of dried lavender in my bathroom that my sister got. I really like it. So why not make my own bouquet, I thought. After researching on the internet, I found the simplest instructions on blurit.com and followed them. I pretty much cut the stems that had a flower to a similar length. I tied them with a rubber band because I read that as the stems dry, they may shrink and fall. A rubber band prevents this by contracting with the lavender.

Now, I just have to wait a few weeks until they are dry and find a nice vase to put it in. My house smells great now. If I'm not too lazy, I may dry more lavender to make sachets. We'll see...


Lavender on my table.


Lavender in front of my house.


Hanging lavender on my blinds.

Monday, September 29, 2008

Before & After: My Kitchen Chairs (Finally...)

While I knew that my blog would be mainly focused on food, I wanted to also have some house-focused posts. I bought my house over two years ago. It's 80 years old and had already been renovated. Now I only have to worry about making it pretty... It's been two years and I've done a few things but there are still a lot of projects out there.

If you're wondering whether I only ate while I was visiting my mom in Montréal, the answer is no. I also got to work on upholstering two of my kitchen chairs. Well, when I say "I", I mean we, as in my mother and I. Not only is my mom a good cook, she does other stuff very well too, like sewing. She's actually sewing my drapes (I can't wait for them to be done!). Supposedly, she knows a bit about reupholstering chairs too.


I suffer from great plans and indecision. I asked my mother's friend if I could have the four chairs she was going to throw out, oh, about 5 years ago. I was planning on refinishing and reupholstering them. I tried to refinish the frame 3 years ago, but it was hard work. So I gave up and forgot them in the rain. A couple of chairs kind of got mouldy. I also have never been able to find a fabric that I was happy with. So the chairs sat there because of my indecision.

Finally, I found a nice brown and white material I liked in Vietnam. I hauled back two metres. After shopping at a Montréal fabric store with my mom for backing for my drapes, I found another material I liked better for my chairs. My mom thought it was sturdier too for seating. So I decided to buy it and I (my mom) will make cushions out of the fabric from Vietnam (my sister also has her eyes on it!).

I really enjoy the Before & After entries on Design*Sponge, so here is mine. Mine is a much simpler makeover but it's a good start.


Before & After. You can imagine the old chair was not very comfortable either.

Reupholstering Chairs
I meant to take pictures while upholstering but the job requires lots of focus and hands, so I did not take any pictures in the process. This is something that is more easily done by two people - one holding the fabric taut, the other stapling. It's all about keeping the fabric TAUT (I like that word: TAUT! TAUT!). Casa Sugar has better reupholstering instructions and even directs to a Ready Made video, if you need.

Chairs with removable seating
Foam to cover your chairs
Staple gun with short staples (1/4")
Fabric to cover seating

Remove the seating from chairs - usually requires unscrewing a few screws.
Cut out a piece of foam in the shape of your seat.
Staple the foam in place on one edge and the opposite edge - just to keep the foam in place when you staple your fabric.
If you have a patterned fabric, make sure you know which way you'd like to have it and cut out each piece in the same direction.
Cut out a piece of fabric in the shape of your seat with an extra 2" around the perimeter.
Fold the fabric in at the edge before stapling - to prevent from fraying.
Staple the fabric on one edge in the middle on the back side.
While pulilng the material taut, staple on the opposite edge in the middle also.
Do the same with the other two edges.
From each of the centre, staple toward each of the corners.
The corners are the hardest. Gather the material, pull, keep the fabric taut and staple.
Tada!


The old seat and a piece of foam over it.


Make sure you don't cover the screw holes - we did that once...!


Newly upholstered seat.