Showing posts with label salad. Show all posts

Sunday, August 21, 2011

White Beans and Mushroom Salad

After having dinner at her friend M's, my sister raved about a white bean and mushroom salad, served with steak. Her instructions were sauté mushrooms, with a lot of onion, mix with white beans and grilled veggies, and toss with a Dijon dressing; serve with steak. I decided to skip the steak and make a healthy and very filling salad.

White Beans and Mushroom Salad

White Beans and Mushroom Salad

Dressing
Honestly, I throw in whatever looks good for a dressing and adjust to taste. I cheat and rarely follow the 3:1 oil to vinegar usually recommended.

* 3 Tbsp extra virgin olive oil
* 1 Tbsp Dijon mustard
* 3 Tbsp white wine vinegar
* salt, to taste
* freshly ground black pepper, to taste

Mix all the ingredients together.

Salad
* oil
* small onion, sliced thinly
* 2-3 good handful of mushrooms of your choice, sliced
* thyme, dry or fresh
* salt, to taste
* freshly ground black pepper, to taste
* dried chili flakes, optional
* 1 can white (cannellini) beans
* grilled veggies of your choice, such as peppers or zucchini

In a hot pan, heat oil.
Add onion and cook for 1 minute.
Add mushrooms and sauté.
Add thyme and season with salt, pepper and chili flakes.
Meanwhile, rinse and drain white beans.
Place beans in a bowl.
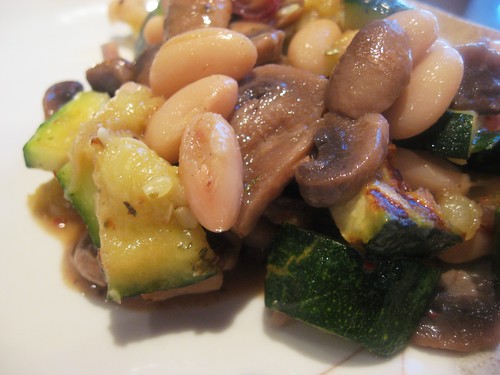
Once mushrooms are cooked through and dry, add mushrooms and grilled veggies to the bowl of beans.
Pour the dressing and mix well.
Refrigerate or serve hot.
Tada!

White Beans and Sautéed Mushroom Grilled Zucchini
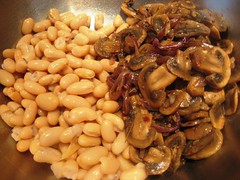
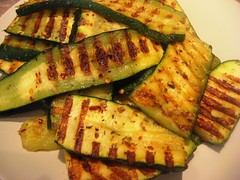
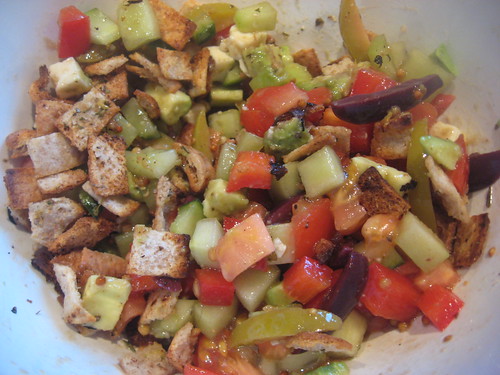
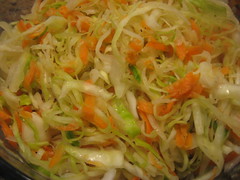
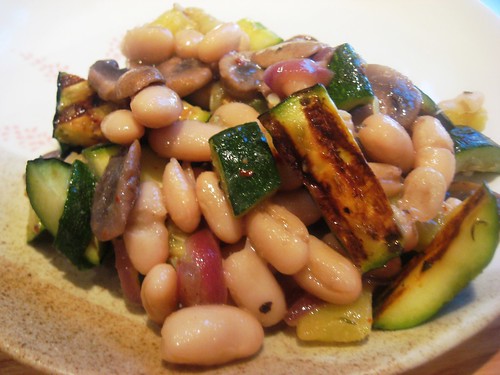
White beans and mushrooms. Grilled Zucchini.

I find that allowing the components to sit in the dressing really help add flavour to the salad. I am happy eating this salad as lunch for a whole week. I like eating it at room temperature so take it out of the fridge and let it warm up a bit. I love the creamy beans, with the mushrooms and grilled zucchini. Tasty eating with no guilt!

White Beans and Mushroom Salad

For mushroom lovers, more mushroom posts:
* Bacon & Parmesan stuffed Mushrooms
* Chicken and Mushroom Orzo
* Fried Polenta and Mushrooms
* Goat Cheese stuffed Mushrooms
* Mushroom Crusted Tilapia
* Mushroom Pita Pizza
* Mushroom Ravioli
* Mushroom Soup
* Potato Mushroom Bruschetta
* Red & White Quinoa Mushroom Risotto
* Spinach and Mushroom Cannelloni

Wednesday, September 15, 2010

Cauliflower Salad

To accompany the goat cheese stuffed mushrooms, I made a cauliflower salad, also one of Laura Calder's (from French Food at Home) recipes. I really enjoy cauliflower in all its forms. I love it raw (give me cauliflower and dip, and I could probably finish a whole head), as well as cooked. I don't even mind it overcooked, as it often is in aloo gobi. I'm actually surprised I don't have any cauliflower recipes - I think I just didn't get nice pictures because I also love making cauliflower soup!

Cauliflower Salad

Cauliflower Salad
From French Food at Home.
What attracted me to this recipe were the salty sun-dried tomatoes and olives! I loved both against the crunchy raw cauliflowers with the lemony dressing. I only followed the ingredients and not the amount. I used basil since I don't have tarragon on hand.

* 1 small cauliflower or half a large one
* 1 clove garlic minced
* 2 generous handfuls of sun-dried tomatoes, packed in oil
* 2 generous handfuls black olives, sliced
* 2 handfuls of fresh tarragon or basil leaves, chopped
* zest of a lemon and juice to taste
* extra virgin olive oil, for drizzling
* salt and pepper, to taste

Break cauliflower into florettes, discarding the central stem.
Slice them thinly and put them in a bowl.
Add the olives and sun-dried tomatoes.
In a small bowl, mix the garlic and lemon zest with the lemon juice and olive oil.
Season with salt and pepper - not too much salt because of the salty components.
Pour the dressing over the vegetables.
Garnish with chopped basil.
Tada!

Cauliflower Salad

This salad is even better the next day, once the cauliflower has had a chance to absorb all the dressing.

Saturday, September 4, 2010

Caprese Salad

There's nothing more simple than a Caprese salad. One barely needs a recipe but I thought I would post it because 1) I like it 2) it's tomato season and 3) it's just such a pretty dish! Somehow my posts got out of order. You may not have noticed, but it slightly annoys me that this salad that I served before the pea ravioli's is being posted a week later. Ok, I digress.

IMG_0988

Caprese Salad
Since this is a very simple salad, you have to go for the best ingredients. I bought heirloom tomatoes from the farmer's market and buffalo mozzarella, and picked basil from my backyard.

* best tomatoes you can find, sliced thinly
* buffalo mozzarella, torn or sliced
* basil leaves, torn if big
* extra virgin olive oil
* balsamic vinegar
* salt and pepper, to taste

On a plate, place a slice of tomato, a piece of mozzarella and then basil.
Repeat in a circular shape, overlapping each ingredient.
Drizzle the extra virgin olive oil, and then the vinegar.
Season with salt and pepper.
That's it - tada!

IMG_0991

You could also make this salad "free style" by chopping pieces of tomatoes, adding the mozzarella and basil, and adding the dressing. It's really the perfect salad for summer!

For other summery recipes:
* Fajita Salad
* Four Bean Salad
* Fresh Corn Salad
* Garden Salad with Rice Wine Vinegar and Maple Dressing
* Grilled Pizza with Pesto and Buffalo Mozzarella
* Grilled Vegetable Couscous

Saturday, December 12, 2009

Chopped Greek Salad

Not only did I wait very long to make this recipe that I spotted on the blog Use Real Butter, it also took me a very long time to write about it. I have been distracted by a new job and a gym membership. But I will try to end the year off not too weakly, and a visit to my mother's for the holidays should help any blog blues!

Back to the recipe! When I saw this recipe, it really appealed to me because I like Greek salads very much and I was intrigued by the chopping component. I believe I have some slight OCD tendencies, which really comes out in the kitchen when I'm chopping. I can spend a lot of time, obsessively chopping food in small, uniform pieces. My sister and mom can attest to that. But other than feeding my chopping needs, it was a very tasty salad. I really enjoyed being able to taste each ingredient in one bite, and experiencing the salty (feta, olives), crunchy (pita croutons), fresh (cucumber, tomato, peppers) and creamy (avocado) components at the same time.

IMG_9168

Chopped Greek Salad - Serves 2
Adapted from Use Real Butter's Chopped Greek Salad. As I mentioned, I really liked the addition of the pita croutons which reminded me of a fattoush salad.

For pita croutons
* 1 pita, sliced in small squares
* olive oil
* salt
* dried oregano
* garlic powder
* lemon zest

Place the small pieces of pita in a bowl.
Drizzle with olive oil making sure to coat most of them.
Sprinkle with salt, oregano, garlic powder and lemon zest.
Spread on a parchment lined baking sheet in one layer.
Broil in the oven for 5 min on the top rack - keep an eye on them or they will burn quickly!

IMG_9161 IMG_9164
Chopping the croutons and a quick broil.

For the vinaigrette

* balsamic vinegar
* olive oil
* dried oregano
* honey dijon mustard, to taste
* salt and pepper, to taste

Mix the vinegar, olive oil, oregano, mustard, salt and pepper to make a vinaigrette.

Assembling the salad
* ½ a red pepper, diced small
* 4" section of cucumber, diced small
* 1 small tomato, diced small
* ½ an avocado, diced small
* small piece of feta, diced small
* ½ a handful of olives, sliced

Place
all the vegetables, feta and olives in a bowl.
Pour the vinaigrette onto the vegetables and mix well.
Right before serving, add the pita croutons, and mix in - so they don't get soggy.
Tada!

IMG_9166
Chopped components of the salad.

IMG_9167
Healthy and also tasty!

Sunday, September 13, 2009

Fish & Chips

After my sister's trip to Prince Edward Island, she had seafood on her mind. She also brought back potatoes from PEI, so she invited my mom, her husband H and I over for fish and chips. She searched the internet and decided to follow Tyler Florence's recipe for both. The recipe provided useful tips for frying.

IMG_8738

FrenchFries
Adapted from Tyler Florence.
The trick for having crispy fries is to deep fry them twice. While Tyler Florence's recipe did specify the temperatures, my sister did not have a deep frying thermometer so she just tried to guess and played with the heat level. She did follow the time suggested for frying.


* salt, to taste
* red chili flakes, to taste
* oil
* potatoes, cut into wedges

Pre-mix salt and chili flakes.
Heat 3 inches of the oil to 325F (medium - medium high).
Add one batch of potatoes and fry for 2-3 min; they should not be crisp or fully cooked at this point.
Remove the chips to a paper towel-lined platter to drain.
Repeat with the rest of the potatoes.
Increase the heat to 375F (high heat).
Again, add a batch of potatoes into the oil and fry for 4-5 min, until crispy and brown.
Remove the chips to a paper towel-lined platter to drain.
Immediately season the chips with the salt mixture while they are still hot.
Repeat with the rest of the potatoes.
(You can place the fries in a preheated oven if you want to keep them warm while frying the fish.)

IMG_8709 IMG_8722
Freshly cut fries (unpeeled) and fried the first time.

IMG_8726
Golden and well-seasoned.


Beer Battered Fish

Adapted from Tyler Florence.
My sister thought the use of rice flour very effective.
She replaced the soda water with beer (Corona). The crust was beautifully fluffy and crisp.

* 2 cups rice flour
* 1 tbsp baking powder
* salt, to taste
* ground black pepper, to taste
* 12 oz beef - we used Corona
* 2 (8 oz) fish fillets, cut into large pieces (we used cod and basa)
* ½ cup rice flour for dredging
* 1 lemon, cut into wedges

In a large bowl, combine the flour, baking powder, salt and pepper.
Pour the beer into the flour mixture and whisk to a smooth batter.
Spread the rice flour on a plate.
Dredge the fish pieces in the rice flour and then dip them into the batter, letting the excess drip off.
Add the pieces of fish into the oil (375F or high heat).
Fry the fish for 4-5 minutes until crispy and brown.
Serve with lemon wedges.
Tada!

IMG_8717 IMG_8719
IMG_8731 IMG_8733
The batter was bubbly from the beer and baking powder, resulting in a nice crust for the fish.

IMG_8739

The fish was great with homemade tartar sauce.


IMG_8724
IMG_8734
The fish & chips were served with homemade coleslaw, tartar sauce and mayonnaise (for the chips).


Peach Crostata
My sister has made my friend The Gastronomer's peach crostata recipe a few times. She loves it because it's quick, easy and tasty. This time, her fiancé D made the dough with shortening instead of butter because my mom does not like butter (he also made extra for my blueberry pie - post to come next!). He had some difficulty with the dough and it kept breaking. The crostata still came out nicely. It's great with a side of ice cream!

IMG_8743
IMG_8744
IMG_8745

Peach crostata with the addition of raspberries.

Thursday, August 13, 2009

Garden Salad

I invited myself over to my friends T's and Superfly's. I hadn't seen their two-year old in a while and I didn't want her to forget her Auntie N! They were nice to invite me over for some grilled pizza. I can't turn down grilled pizza! I volunteered to bring a salad since I had lettuce and tomatoes from my garden.


Garden Salad
This was inspired by what was in my garden and the peas in my refrigerator. I then read a recipe for Farmers Market Salad that used peas in GOOP (Gwyneth Paltrow's weekly newsletter). I liked that she used maple syrup in the vinaigrette and decided to try it.

* lettuce, well washed and torn (I had red leaf and some peppery arugula)
* fresh green peas (from my garden and supplemented by the supermarket)
* cherry tomatoes, sliced in half
* half an avocado, cubed
* rice vinegar
* maple syrup
* honey grain Dijon mustard (that's all I had in the fridge)
* extra virgin olive oil
* salt
* pepper

Place lettuce, green peas, tomatoes and avocado in a bowl.
For the dressing, place the rest of the ingredients in a small bowl, to taste, and whisk together. (I meant to measure but forgot. I was heavy handed with the maple syrup because I liked the sweetness it provided.)
Pour on top of the salad.
Tada!


Little P is already learning how took work a stove at her age!


P played while her dad barbecued dinner.


Nothings beats grilled pizza!


A side of salad makes it healthy!

Monday, July 27, 2009

Fresh Corn Salad

For our last dinner together, I decided to make Barefoot Contessa's Fresh Corn Salad. It's one of the recipes I've made the most in her cookbook. It's easy and so good. I realize it's not quite corn season yet, but I couldn't resist. I solemnly swear not to buy corn until August...


Fresh Corn Salad
From Barefoot Contessa.

* 5 ears of corn, cooked and kernels sliced off
* ½ cup small-diced red onion (1 small onion)
* 3 tablespoons cider vinegar
* 3 tablespoons good olive oil
* ½ teaspoon kosher salt
* ½ teaspoon freshly ground black pepper
* ½ cup julienned fresh basil leaves

In a bowl with the cooked kernels, add all of the ingredients except for the basil and mix well.
Ideally, let it sit for an hour for the flavours to meld together.
Top with basil before serving.
Tada!


My sister made bean burgers as our main course. I didn't pay enough attention to write down the recipe. It was very tasty. An overall healthy meal!


L's bean burgers.

Wednesday, April 29, 2009

Classic Potato Salad

Last week, I went over to my friends T & R for a barbecue and a long poker game. I offered to make something and R requested potato salad. I think the rare times I do make potato salad, I use a vinaigrette dressing. However, I figured R wanted the classic creamy potato salad. So I referred to my Williams-Sonoma Salad book. I really liked the addition of pickle and the robust flavour of dill in this salad. It was perfect as a side to our hamburgers and sausages.


Classic Creamy Potato Salad - 8-10 servings
I adapted the Williams-Sonoma's recipe to my taste. The original recipe called for eggs but I was not to keen on that. My friend R doesn't like red onion, so I replaced it with green onion. I didn't have Dijon mustard so used honey Dijon. The recipe states to preferably use homemade mayo but since I knew of one our friends was pregnant, I used a store bought one. I really liked the addition of sweet pickles and added more than the recipe called for. One last note, it stated the recipe makes 4-6 servings. If this is just a side, I think it's way too much potato salad so I would make a smaller portion.

* 2-½ red potatoes
* salt, to taste
* pepper, to taste
* ½ cup mayo
* ½ cup light sour cream
* 1 tbsp pickle juice (from sweet gerkhins)
* 1-2 tbsp honey Dijon mustard
* 3 green onions, sliced thinly
* ½ cup fresh dill
* ¼ cup minced sweet pickle
* 1 tsp paprika

Cook potatoes in salted water for 20 minutes, or until cooked.
Cut the potatoes into cubes.
Mix together the mayo, sour cream, pickle juice and mustard.
Add to the potato cubes and mix.
Add the green onion, fresh dill, pickle, salt and pepper.
Again, mix thoroughly.
Garnish with paprika.
Tada!


Cooked potatoes and cubed.


Creamy dressing and the addition of green ingredients.

Tuesday, March 24, 2009

Gỏi Mực (Cuttlefish Salad)

I am not the only one who is spoiled by my mother. My sister is also spoiled. My mom spoils us equally! So when my sister mentioned that she could really go for gỏi mực (cuttlefish salad), my mom was happy to make it. My sister and I have always referred to this salad as squid salad. I only realized that my mom was using cuttlefish when I read the description on the frozen package.


I wikipedia-ed to realize the difference between cuttlefish and squid. The body of the cuttlefish is round and thicker, making it conducive for this salad; the squid has a tubular shape. While reading Wikipedia, it states that cuttlefish is considered among the most intelligent invertebrate species. This reminded me that I had seen a TV show on cuttlefish. They were cute and very smart! When I mentioned this to my mother, she said they also make great gỏi's (salads)...!


Frozen cuttlefish being thawed.

Gỏi Mực (Cuttlefish Salad) - Serves 4-6
Traditionally, this salad is only made with cuttlefish. However, my mom adds red peppers for colour and to act as a filler - cuttlefish are expensive. This salad is served at room temperature.

Pickled onion
The onion should be lightly pickled so the raw onion flavour is not too strong.

* 1 onion, sliced thinly
* ½ cup vinegar (or lime juice)
* ¼ tsp salt
* 1 tbsp sugar

Soak onion in vinegar, salt and sugar, for about 15 minutes.
Adjust to taste - if it's too sour, add some sugar.
Squeeze the liquid out and set the onion aside.

Dressing
* 5 tsp fish sauce
* 2 tsp sugar
* juice of ½ lime
* 1 tsp chili garlic sauce (like samba oelek), or to taste

Mix all of the ingredients.
Adjust to taste.


Putting the salad together
* water
* 1 cuttlefish (about 750 g)
* 4-5 pieces of ginger
* salt
* pickled onion
* 1 red pepper, sliced thinly
* roasted peanuts, crushed
* Thai basil, sliced thinly

Boil water, enough so the cuttlefish is submerged.
Add some salt and the pieces of ginger.
Cook the cuttlefish for about 4-5 minutes - overcooking will make it chewy.
Let cool until it can be manipulated.
Slice thinly.
Add the dressing to the cuttlefish slices.
Add the onion and red pepper, and mix.
Adjust seasoning to taste.
Top the salad with Thai basil and peanuts.
Serve with bánh tráng (toasted sesame rice paper).
Tada!


Cooking and slicing the cuttlefish.


Mixing the cuttlefish slices with the vinaigrette.


Topped with Thai basil and crushed peanuts.


Enjoy on top of a piece of bánh tráng.